How to photograph your own paintings:
First, DON'T. Find a professional photographer to do it for you.
Okay, you can't get a professional. Try to get your hands on a very large copy stand with four lights.
Okay, you can't do that either. That's why you're on line Googling "How to photograph paintings."
***
Here are my “Photo Tips for the Broke” on photographing paintings. This is assuming you can spend no money at all on equipment.
1. Set your camera on the highest resolution possible. Seems like a no-brainer, but sometimes you find you’ve accidentally reset it to a lower res. If your camera isn't good enough, borrow one.
(If you can only get a film camera, take the film to Target or whatever and they will put the images on a disc for you. It's much cheaper than having prints made.)
2. Download GIMP (GNU Image Manipulation Program). It’s free, and it works pretty much like Photoshop. Most things you can fix by just cropping and brightness/contrast adjustment. You can also level it if it’s crooked. The “white balance” function usually fixes mine right up.
GIMP Dowloads:
Linux
Windows
Macintosh
3. Hang the picture if possible. If not, set it on a box and prop that up against the wall. Don't worry about the background because you're going to crop it.
4. Use a level to make sure the picture is straight. You can straighten it in GIMP if it's not, but it's easier to level it in the first place.
5. Never, ever, ever use regular incandescent lighting. Sunlight is free. The best light would be out of doors on a sunny day but not in direct light. One good tip I read was to make a tent out of white sheets and shoot inside that in direct sunlight, but I haven't tried that yet.
Indoors, you want two 100-watt full spectrum lights at 45 degree angles from the painting. If you use artificial lights, use something to diffuse the light, like tracing paper.
6. Use a tripod if you have one. If not, stack up boxes or whatever until the camera is at the right height. Use the timer. If you're using natural light, set the ISO to 800.
7. Always crop the picture so it only shows your painting. You can do a separate shot of it hanging on a wall in a room to show how it looks hung, but right now we're just working on getting the most accurate possible photo of your painting. Nobody wants to see the background.
8. Save the best version as a .png or .gif file. You can make .jpg files of it if that's what you need to upload to a site, but .jpgs degrade every time they're saved. If you save the best version as a .png or .gif, it won't be as much of a problem if you accidentally resave it.
Showing posts with label photography. Show all posts
Showing posts with label photography. Show all posts
Saturday, May 7, 2011


Friday, May 6, 2011
Photography: Small objects and jewelry
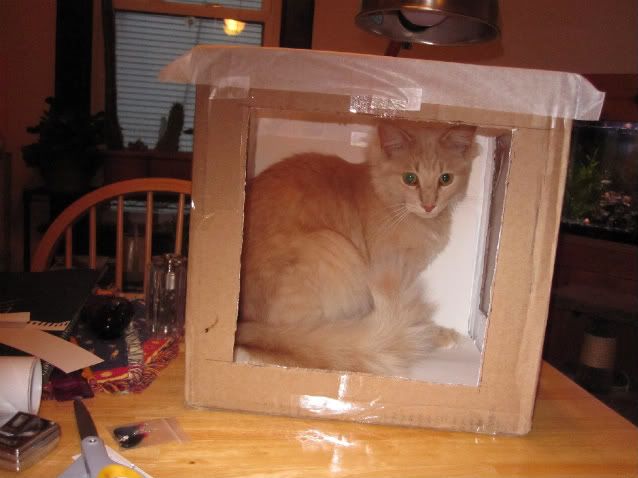
I’m pretty hopeless at photographing stuff. Someone on the Regretsy forum posted this really helpful link on how to make a cheap light box out of stuff you already have at home. This is for small 3-D objects.
Tutorial: How to make an inexpensive light tent
You can also get portable studio kits like this one for $40.
I painted the inside white instead of using Bristol paper, and when none of my indoor lights was good enough, I took the box outside. That way I got full-spectrum light without any harsh shadows at all. I set the ISP for 800, then had to raise the contrast a bit in editing. 1600 was way too bright.
Finished product:

I got feedback that people needed to see the scale of my items, so I put this together. It's a piece of paper folded into a triangle with a paper ruler taped to it. I downloaded the paper ruler here: Printable paper rulers. (Yes, I verified the size with a real ruler! It's accurate.)

One thing you have to watch out for with any light box, of course:
Tutorial: How to make an inexpensive light tent
You can also get portable studio kits like this one for $40.
I painted the inside white instead of using Bristol paper, and when none of my indoor lights was good enough, I took the box outside. That way I got full-spectrum light without any harsh shadows at all. I set the ISP for 800, then had to raise the contrast a bit in editing. 1600 was way too bright.
Finished product:
I got feedback that people needed to see the scale of my items, so I put this together. It's a piece of paper folded into a triangle with a paper ruler taped to it. I downloaded the paper ruler here: Printable paper rulers. (Yes, I verified the size with a real ruler! It's accurate.)
One thing you have to watch out for with any light box, of course:
Saturday, April 23, 2011
Selling Photographs on CafePress
Someone on Twitter asked me if you could sell photography on CafePress, and it's hard to go into details in 140 characters so I'm doing it here.
Pretty much all the images I sell on CafePress are photos. The photos of my art were taken by Pat Thielen. I uploaded them as 3000x3000 px .TIFF images. So far the quality has come out very true with anything I've ordered on paper, but a little too colorful on ceramics.
OK, here's how it works:
Types of Shops
You can create a basic shop for free. You can create as many as you want. Each free shop can only have one of each product. For example, you couldn't have several regular mugs with different images on them. You COULD have one image on a regular mug, another image on the large mug, and a third image on the stein, if you wanted.
When I only had 5 paintings on there, I just had 5 basic shops, and that was fine. Eventually I had so many designs up it seemed worth it to get a premium account. Those allow you to put as many of the same items as you want. I can put up 30 mugs with different designs if I feel like it. The costs are as follows:
$6.95 per month
$18.45 for 3 months
$34.95 for 6 months
$59.95 for 1 year
You have complete control of the images. CafePress can not go putting your images on other things, and people can't special-order your images on particular items. They can only buy what you set up.
Getting Paid
CafePress has a base price for each item. That money all goes to them. You set the mark-up as high as you want. All of the mark-up goes to you... IF the items are bought directly through your shop! That's the big catch.
When you set up either the basic or premium shop, you have the option to make it available through the marketplace or not. If you do, then people can find your stuff through the marketplace by searching for your name or key words. It makes your stuff more available.... BUT you only get 10% commission on the sale.
Here is a link to their full pricing policy: Shop Pricing Policy
And their explanation about the 10% commission: Marketplace pricing and commission
Examples
I'm no photographer, but I have a few small photographs available in my shop.
Painting Studio
I took this one with my cell phone on low resolution. I can only be printed on small items.
Ireland
These are three photos I took with a cheap disposable panoramic camera. I had the negatives put on a CD and uploaded them that way. As you can see, they work for slightly larger items, like the small framed prints.
On the Wings of Love
Another one taken with a film camera and put on CD so I could upload it digitally. This was taken with my real camera so it's higher resolution. Still not as high as it would be if I'd used my new digital camera! But as you can see it's large enough to do the largest size posters.
Pretty much all the images I sell on CafePress are photos. The photos of my art were taken by Pat Thielen. I uploaded them as 3000x3000 px .TIFF images. So far the quality has come out very true with anything I've ordered on paper, but a little too colorful on ceramics.
OK, here's how it works:
Types of Shops
You can create a basic shop for free. You can create as many as you want. Each free shop can only have one of each product. For example, you couldn't have several regular mugs with different images on them. You COULD have one image on a regular mug, another image on the large mug, and a third image on the stein, if you wanted.
When I only had 5 paintings on there, I just had 5 basic shops, and that was fine. Eventually I had so many designs up it seemed worth it to get a premium account. Those allow you to put as many of the same items as you want. I can put up 30 mugs with different designs if I feel like it. The costs are as follows:
$6.95 per month
$18.45 for 3 months
$34.95 for 6 months
$59.95 for 1 year
You have complete control of the images. CafePress can not go putting your images on other things, and people can't special-order your images on particular items. They can only buy what you set up.
Getting Paid
CafePress has a base price for each item. That money all goes to them. You set the mark-up as high as you want. All of the mark-up goes to you... IF the items are bought directly through your shop! That's the big catch.
When you set up either the basic or premium shop, you have the option to make it available through the marketplace or not. If you do, then people can find your stuff through the marketplace by searching for your name or key words. It makes your stuff more available.... BUT you only get 10% commission on the sale.
Here is a link to their full pricing policy: Shop Pricing Policy
And their explanation about the 10% commission: Marketplace pricing and commission
Examples
I'm no photographer, but I have a few small photographs available in my shop.
Painting Studio
I took this one with my cell phone on low resolution. I can only be printed on small items.
Ireland
These are three photos I took with a cheap disposable panoramic camera. I had the negatives put on a CD and uploaded them that way. As you can see, they work for slightly larger items, like the small framed prints.
On the Wings of Love
Another one taken with a film camera and put on CD so I could upload it digitally. This was taken with my real camera so it's higher resolution. Still not as high as it would be if I'd used my new digital camera! But as you can see it's large enough to do the largest size posters.
Subscribe to:
Posts (Atom)